Where do I begin?
What an experience! For folks who do not know what #CloudResumeChallenge is about, buckle up. The challenge was introduced to me and my classmates the start of the spring semester at Miami Dade College. The challenge has its ups and challenges. It is a great start to get yourself started with the different services AWS has to offer and get integrated. For quick background of myself, I am currently a supervisor at Teleperformance on the Hughes account. prior to this challenge I didn't have any experience working with cloud resources. However, if you're like me don't worry, AWS does an amazing job giving you all the resources you need to use their services, especially as a newbie like myself.
It may take some time and hands-on walkthroughs to completely understand the services and how they work, but no worries AWS has extensive documentation and their are numerous blog posts that give you what you need. This blog post contains a short walkthrough of the steps I took to complete the #CloudResumeChallenge and what I've learned from this experience.
Getting Started
I started with using codepen.io and with the help of my teammates I was able to get the ball rolling with my HTML and CSS. The website was nice, it allow you to see exactly what you are typing out in your HTML and CSS. There are no surprises. You export your template out to your desktop, this is it. I also ended up downloading VS code editor.
Setting up the frontend
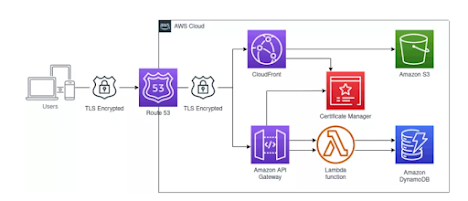
Next, I setup an AWS account. I created an S3 bucket, where I uploaded my template files to my bucket. I hosted my frontend content as a static website. Once the site was hosted I purchased a domain name (calicampbellworld.com) in Route53. After purchasing the domain on Route53, I used Amazon Certificate Manager to get the certificates needed to secure the site. Once the certificates were created I used Amazon CloudFront to secure the site (over HTTPS). I went back and added JS code to the index file.
Setting up the backend
I spent a few days clicking around in AWS IAM, Lambda, DynamoDB and API Gateway. This is a good way to get to know the service and what it does. Once I felt comfortable, I set up a Visitor count function that my frontend would use to track the amount of visitors who visit my site. To start, I created all of these resources using the console. By the time I got it working I had encountered dozens of errors. First, I had to figure out how I wanted to store my visitor count in DynamoDB.
I learnt a bit about DynamoDB, this type of database differs from the formerly most common SQL or relational databases in several aspects. Moving over to create my python tests using pytest. It was a simple test that just looked for a successful response
Connecting both front and backend together
After my Lambda function, DynamoDB table and API Gateway were able to work together I was ready to write the JavaScript needed to display my visitor count. The flow needed was Fronted (S3) -> API Gateway -> Lambda -> DyanmoDB. Once I was able to get Javascript to hit an API and update the screen, my website kept giving me a CORS error. I copied my a bunch of variations of my error message into google to find the resources I needed to fix this error and watch numour. The problem ended up being related to enabling CORS in API Gateway AND returning an appropriate response from Lambda.
The key takeaways for me this first half was the project:
- Securing and locking the root account is a MUST.
- Origin-Access Identity is a more secure way of hosting a website on S3.
- A standard DNS server cannot choose the best server to use per request based on specific rules, but other services, such as CloudFront can.
- A CloudFront distribution is a valid target for traffic from a DNS server, and it can take an S3 bucket as its origin.
- Requests from CloudFront to S3 are HTTP, not HTTPS. Amazon S3 does not expose an HTTPS endpoint.
- In some scenarios, Lambda functions may need CORS headers.
- A CloudFront distribution allows specifying domain name aliases to enable access to the cached content via custom domain names.
Infrastructure as Code (IAC)
Now that I have both together working, It greatest challenge IAC. This part you will be deploying your code from the previous sections using code. I feel if you have a good understanding of coding you will be ok with this part of it. Using AWS SAM makes it extremely easy to deploy your services using IAC (AWS CloudFormation behind the scenes). I must have created 10 web-apps to deploy my codes LOL. YAML Indentation was one of the hardest things for me when it came to deployment. I realized that although SAM generated a lot of the started code for me, understanding it would be necessary to add more resources such as a DynamoDB table. I was persistent and finally got it right. When the time came to SAM deploy my project I was ready and confident it would work, and the cool thing is now that I had it as IAC I could create and delete the resources at will. This is when the real usefulness of IAC was clear to me.
CI/CD
Finally, after my project was fully functioning I used GitHub Actions to set up CI/CD. The first thing I did was read GitHub's documentation to see how everything should be set up. Next, I had followed their docs and made my backend redeploy (using a cool SAM Github Action) once the tests were passed. Next, and this is the most useful part, I setup my frontend GitHub repo to automatically push to s3! This was really cool if you are anything like me and like to change things often. This was a game changer because now if I want to edit my website, I just make the change locally, commit to GitHub

No comments:
Post a Comment